# Mimir
小鹅通微组件加载器
取名于北欧神话 - 智慧巨人密弥尔
可动态加载远程 UMD 规范的 js 文件和 css 文件, 来达到业务侧代码与通用组件代码的分离,以及通用组件独立发包在业务侧实时生效(业务侧不需要更新组件版本)
# 使用
# 安装方式
npm install @xiaoe/mimir -S
# 引入模块
import Mimir from '@xiaoe/mimir';
// Mimir为方法,默认不传参数,则会以{ appId: 业务侧的店铺Id, section: market }
2
这里说明一下,Mimir 加载器区分为了 2 套,一套是兼容现在 market 的这种方式,另一种就是通用的方式,通用的方式需要传入 project 参数
参数
| name | type | required | description | default |
|---|---|---|---|---|
| appId | string | 否 | 灰度店铺。 | window.__app_id |
| section | string | 否 | 请求接口分支, 默认为 market(营销),其他中心按各自中心的路由填写。例如:营销,microcomp.xiaoeknow.com/microcomp/market (在新版中就是组件库名,必传) | 'market' |
| project | string | 是 | 当前正在使用的业务工程名,用于班车系统给工程添加灰度名单 (通用版必传) | undefined |
直接使用灰度单例获取 cdn 模块(推荐)。
异步&按需 引入
get 函数参数为模块 id,以及它的配置项,返回一个 Promise 对象。
# 加载 JS 组件
import Mimir from '@xiaoe/mimir';
Mimir({ section: 'market' })
    .get('promoter')
    .then((promoterModule) => {
        promoterModule.default.doSomething();
    })
    .catch(console.error);
2
3
4
5
6
7
# 加载 Vue 组件
组件内注册(推荐)。
通用方式
<template>
    <sms-sign-config :visible.sync="smsSignConfigVisible" @close="smsSignClose"></sms-sign-config>
</template>
<script>
    import Mimir from '@xiaoe/mimir';
    export default {
        components: {
            smsSignConfig: () =>
                Mimir({ section: 'basic-account', project: 'b_basic_setting_fe' }).get('sms-sign-config')
        }
    };
</script>
2
3
4
5
6
7
8
9
10
11
12
market 的加载方式
<template>
    <OverflowPopover></OverflowPopover>
</template>
<script>
    import Mimir from '@xiaoe/mimir';
    export default {
        components: {
            OverflowPopover: () => Mimir({ section: 'market' }).get('overflow-popover')
        }
    };
</script>
2
3
4
5
6
7
8
9
10
11
# 引入的微组件需要依赖外部库的情况
微组件如果是 Vue 组件的话,是不需要在 deps 上加上 vue 库的链接的,因为,Vue 组件打包成 umd 形式其实本质是一个 Vue 的 options 对象,在业务侧进行组件注册,直接使用业务侧的 Vue 库。
<template>
    <OverflowPopover></OverflowPopover>
</template>
<script>
    import Mimir from '@xiaoe/mimir';
    export default {
        components: {
            OverflowPopover: () =>
                Mimir({ section: 'market' }).get('overflow-popover', {
                    deps: [
                        'https://cdn.jsdelivr.net/npm/vue@2.6.14/dist/vue.js',
                        'https://unpkg.com/element-ui/lib/index.js',
                        'https://unpkg.com/element-ui/lib/theme-chalk/index.css'
                    ]
                })
        }
    };
</script>
2
3
4
5
6
7
8
9
10
11
12
13
14
15
16
17
18
# 引入的微组件需要依赖微组件的情况
*虚拟数据,参考结构即可
实际挂载顺序是: cdn 外链(vue@2.6.14) -> ['sms-sign-config', 'upload-tool', 'sms-verify'] -> ['sms-sign-item' , 'sms-sign-dialog'] -> ['sensitive-phone']
从内到外逐层挂载
<template>
    <sensitive-phone></sensitive-phone>
</template>
<script>
    import Mimir from '@xiaoe/mimir';
    export default {
        components: {
            sensitivePhone: () =>
                Mimir({ section: 'basic-account', project: 'b_basic_setting_fe' })
                    .get('sensitive-phone', {
                        deps: [
                            {
                                section: 'basic-account',
                                get: ['sms-sign-dialog'],
                                deps: [
                                    {
                                        section: 'goose',
                                        get: ['sms-verify']
                                    }
                                ]
                            },
                            {
                                section: 'basic-goods',
                                get: ['sms-sign-item'],
                                deps: [
                                    {
                                        section: 'basic-material',
                                        get: ['sms-sign-config', 'upload-tool']
                                    }
                                ]
                            },
                            'https://cdn.jsdelivr.net/npm/vue@2.6.14/dist/vue.js'
                        ]
                    })
                    .then((res) => {
                        console.log('sensitive-phone: ', res);
                    })
                    .catch(console.error)
        }
    };
</script>
2
3
4
5
6
7
8
9
10
11
12
13
14
15
16
17
18
19
20
21
22
23
24
25
26
27
28
29
30
31
32
33
34
35
36
37
38
39
40
41
# get 方法的参数
| name | type | required | description |
|---|---|---|---|
| id | string | 是 | 要加载组件的名称 |
| module | object | 否 | 要加载组件的配置,目前只有 deps 属性 |
# 上面的 module
| name | type | required | description |
|---|---|---|---|
| deps | string[] | 否 | 模块依赖,没有时传空数组[]。考虑到各依赖之间可能有严格的引入顺序要求,将按数组顺序串行引入。 |
module 其余属性将透传到 fetcher 参数
若组件没有外部依赖,可只传 id。
Mimir({ section: 'market' })
    .get('coupon')
    .then((coupon) => {
        console.log('coupon: ', coupon);
    })
    .catch(console.error);
2
3
4
5
6
<template>
    <coupon></coupon>
</template>
<script>
    import Mimir from '@xiaoe/mimir';
    export default {
        components: {
            coupon: () => Mimir({ section: 'market' }).get('coupon')
        }
    };
</script>
2
3
4
5
6
7
8
9
10
11
import Vue from 'vue';
import Mimir from '@xiaoe/mimir';
Vue.component('coupon', () => Mimir().get('coupon'));
2
3
# 实例化
或者手动创建实例(业务侧其实用上一种方式获取单例即可)。
accessor.js
import { createAccessor } from '@xiaoe/mimir';
const accessor = createAccessor({
    appId: '',
    modules: [
        {
            id: 'testFunc',
            deps: ['https://code.jquery.com/jquery-3.6.0.min.js']
        },
        {
            id: 'test-button',
            deps: [
                'https://cdn.jsdelivr.net/npm/vue@2.6.14/dist/vue.js',
                'https://cdn.jsdelivr.net/npm/vant@2.12/lib/index.css',
                'https://cdn.jsdelivr.net/npm/vant@2.12/lib/vant.min.js'
            ]
        },
        {
            id: 'overflow-popover',
            deps: [
                'https://cdn.jsdelivr.net/npm/vue@2.6.14/dist/vue.js',
                'https://unpkg.com/element-ui/lib/index.js',
                'https://unpkg.com/element-ui/lib/theme-chalk/index.css'
            ]
        },
        {
            id: 'ReactPopup',
            deps: [
                'https://unpkg.com/react@17/umd/react.production.min.js',
                'https://unpkg.com/react-dom@17/umd/react-dom.production.min.js'
            ]
        }
    ]
});
export default accessor;
2
3
4
5
6
7
8
9
10
11
12
13
14
15
16
17
18
19
20
21
22
23
24
25
26
27
28
29
30
31
32
33
34
import accessor from 'xxxx/accessor';
accessor()
    .get('goods-selector')
    .then((goodsSelector) => {
        console.log('goodsSelector: ', goodsSelector);
    })
    .catch(console.error);
2
3
4
5
6
7
# 自定义数据接口
| name | type | description |
|---|---|---|
| fetcher | (modules: {id: string;deps: string[];}[])=>Promise<Record<string, string[]>> | 自定义数据接口函数。可不传。不传时使用默认 fetcher。 |
fetcher 接收需要的 modules,返回 Promise 的 cdn URL,结构如下:
{
    cdnMap: {
        "testFunc": [
            "https://dev-cdn-1251748120.file.myqcloud.com/static/files/testFunc/1.0.1/chunk.umd.js"
        ],
        "overflow-popover": [
            "https://dev-cdn-1251748120.file.myqcloud.com/static/files/overflow-popover/1.0.2/chunk.umd.js",
            "https://dev-cdn-1251748120.file.myqcloud.com/static/files/overflow-popover/1.0.2/style.css"
        ],
        "ReactPopup": [
            "https://dev-cdn-1251748120.file.myqcloud.com/static/files/ReactPopup/3.4.12/chunk.umd.js"
        ],
        "goods-selector": [
            "https://dev-cdn-1251748120.file.myqcloud.com/static/files/goods-selector/0.0.1/goods-selector.css",
            "https://dev-cdn-1251748120.file.myqcloud.com/static/files/goods-selector/0.0.1/goods-selector.umd.js"
        ]
    }
}
2
3
4
5
6
7
8
9
10
11
12
13
14
15
16
17
18
accessor.js
import { createAccessor } from '@xiaoe/mimir';
import axios from 'axios';
const accessor = createAccessor({
    fetcher(modules) {
        const params = {
            ids: modules.map(({ id }) => id).join(',')
        };
        return axios.get('http://xxxxxx/xxxxxx', { params }).then(({ data }) => {
            if (data.code === 0) {
                return {
                    cdnMap: data.data
                };
            }
            return Promise.reject(data);
        });
    },
    modules: [
        {
            id: 'goods-selector',
            deps: [
                'https://cdn.jsdelivr.net/npm/vue@2.6.14/dist/vue.js',
                'https://unpkg.com/element-ui/lib/index.js',
                'https://unpkg.com/element-ui/lib/theme-chalk/index.css'
            ]
        }
    ]
});
2
3
4
5
6
7
8
9
10
11
12
13
14
15
16
17
18
19
20
21
22
23
24
25
26
27
# 如何调试?
# 安装
node 版本^14
npm i
# or
yarn
2
3
推荐使用 npm 或 yarn 安装依赖。 先切换到公司镜像源
npm config set registry http://111.230.199.61:6888/。 不推荐使用cnpm i,因为可能会导致 eslint 和 prettier 的 vscode.autofix 失效。
# 调试
npm run dev
推荐安装 VSCode 的 Eslint、prettier 插件,并开启 autofix。
"editor.codeActionsOnSave": {
    "source.fixAll.eslint": true
}
2
3
# 编译
npm run build
# 提交
脚手架目前已集成 vite、typescript、jest、eslint、prettier 和 husky。 git commit 时将自动进行以下步骤:
- tsc。若存在 typescript 语法编译错误,需解决后再提交,不然 build 时 tsc 会报错。
- jest。单元测试(暂无用例)。
- pretty-quick。自动格式化代码。
# 目录结构
.
├── README.md
├── dist # 编译后的包
├── example
│   ├── deps.d.ts # 无@types的js库,此处手动添加类型声明
│   ├── main.ts # 本地demo
│   ├── style.css
│   └── vite-env.d.ts
├── favicon.svg
├── index.html # 本地demo public模板
├── jest.config.js
├── package # 源码
│   ├── api.ts
│   ├── commonFetcher.ts # 通用获取数据
│   ├── consts.ts
│   ├── createAccessor.ts # Accessor类
│   ├── fetcher.ts # market的获取数据
│   ├── index.ts # 入口文件
│   └── utils.ts
├── package-lock.json
├── package.json
├── tests # 单元测试
├── tsconfig.json
├── vite-proxy.ts # target & cookie
├── vite.config.ts # vite配置文件
└── yarn.lock
2
3
4
5
6
7
8
9
10
11
12
13
14
15
16
17
18
19
20
21
22
23
24
25
26
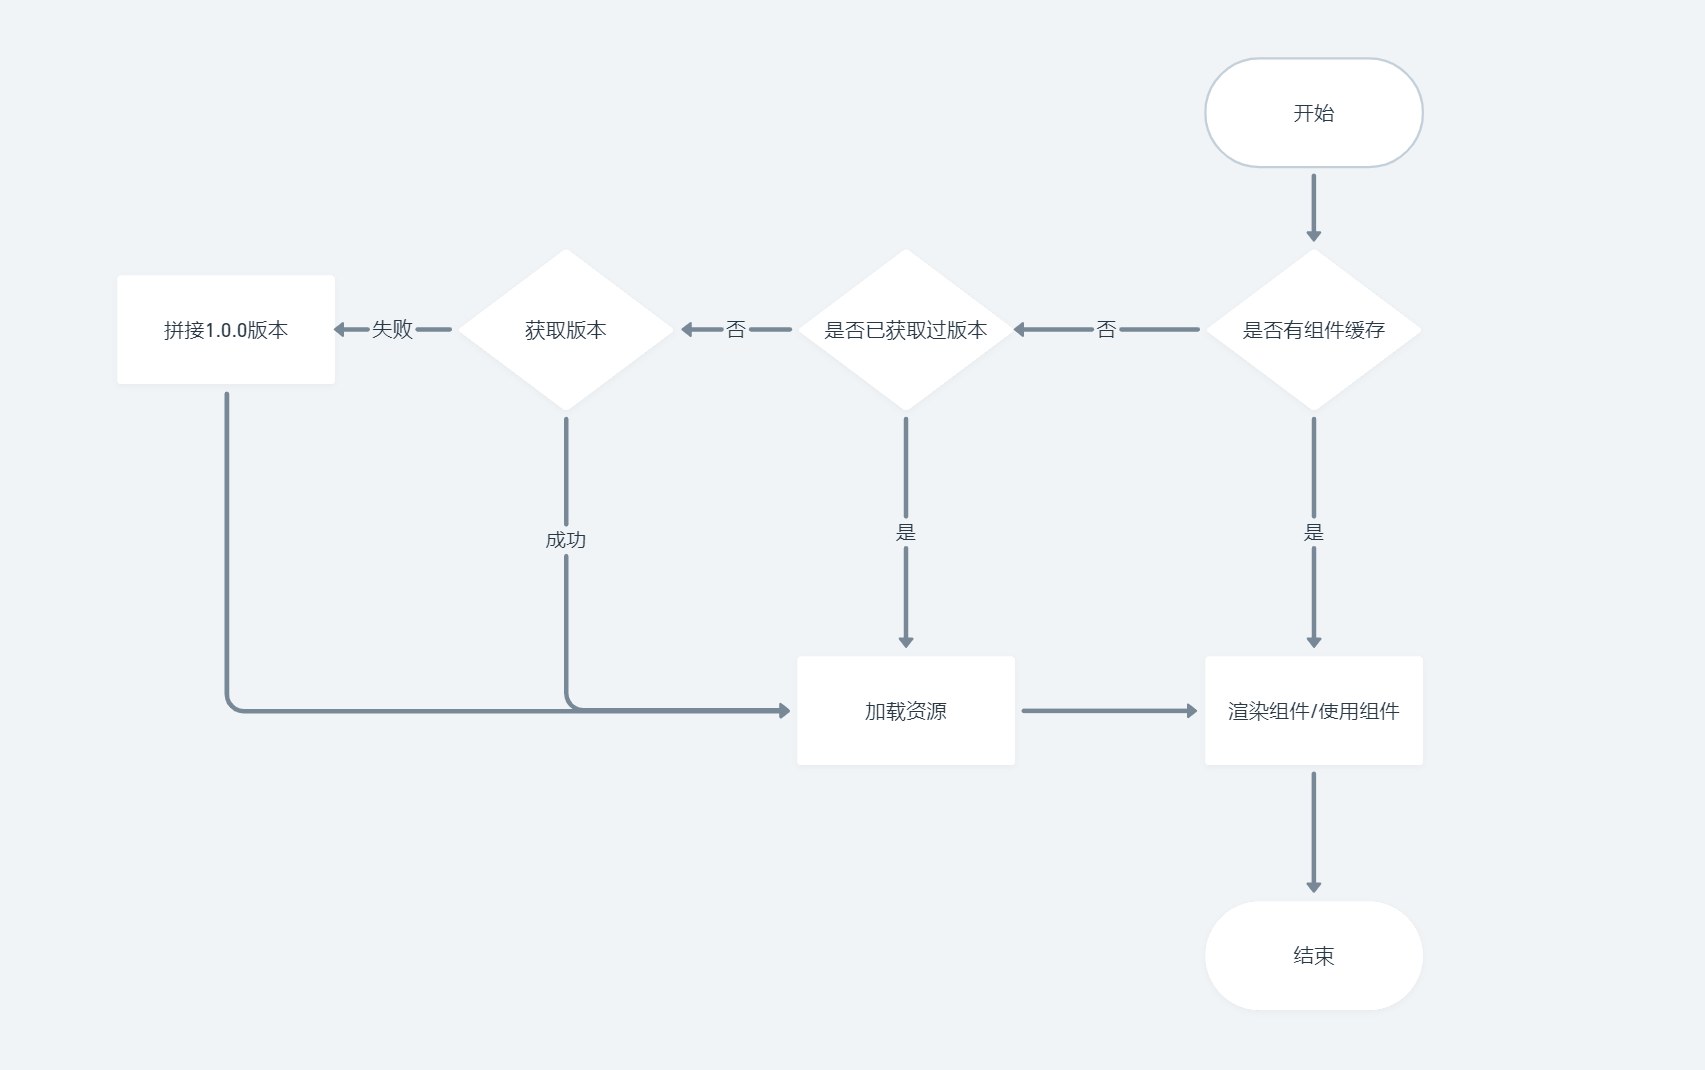
# 三层兜底操作
- fetcher 请求 CDN 资源信息之后,缓存至 localStorage;
- fetcher 请求失败,查询 localStorage 是否存在缓存的 CDN 资源信息;存在则使用缓存,不存在,走第三步
- fetcher 请求失败,且 localStorage 不存在缓存的 CDN 资源信息,拼接需要加载的组件默认版本(1.0.0)的 CDN 链接。注意:组件第一次发版需要强制发布基础版本 1.0.0
# 组件 umd 资源命名规范
由组件名 + @ + 版本号 + (.js|.css)
eg: test-button@1.0.0.js; 上传至 CDN 后链接为:https://dev-cdn-1251748120.file.myqcloud.com/static/files/test-button@1.0.0.js
# 原理
原理是通过请求接口获取各中心组件的 cdn 资源链接集合,然后通过动态创建 script 标签的形式执行组件 js 代码(代码执行后会挂到 window[组件名]变量上),然后以 promise 的形式返回 window[组件名]变量值,从而可以在业务侧中使用。支持异步加载组件、纯 JS 组件。(目前服务端渲染不可用,因为服务端 window 对象不存在)
# 内部接口
CDN 资源接口:
由原现网接口 microcomp.xiaoeknow.com/microcomp/
开发环境接口 microcomp.inside.xiaoeknow.com/microcomp/
测试环境接口 microcomp.test.xiaoeknow.com/microcomp/
改为: B 端 xiaoe-tech.com/microcomp/ 、C 端 xiaoeknow.com/microcomp/和 xeknow.com/microcomp/
更改之后,同一个 mimir 版本可在各个环境的业务侧引用,不需要区分 mimir 在不同环境的版本
注意: 若后续有引用 mimir 的新项目用了新域名,需要让运维在新域名上增加负载
负载: /microcomp/*
开发环境负载值:119.91.78.152:1008
测试环境负载值:marketing_microcomp 系统的 ip+端口
现网环境负载值:marketing_microcomp 系统的 ip+端口(现网有两台机器)
备注:确保 http 和 https 都能访问
# Feature
- 异步加载
- 按需引入
- 缓存
- 模块获取自动合并
- 接口请求失败兜底
- 可拓展(js、css、vue2、vue3、react、......)
# 缺点
- 不支持 vue 服务端渲染
- 目前只支持营销微组件的第三层兜底操作
# 版本记录
# 1.0.9
dillionzhang | 2023.02.27 | 合并链接 (opens new window)
主要更新内容
1.mimir接入rum上报工具
2.微组件业务工程、组件、组件库收集
3.微组件请求耗时
4.微组件挂载耗时

说明:
库中未将aegis包打包进来,采用异步挂载的方式,无需担心体积方面的问题。
并且使用延迟上报,不会阻塞微组件请求和挂载。

可以通过rum后台工具查看具体内容:https://console.cloud.tencent.com/rum/web/custom?region=ap-guangzhou
2
3
4
5
6
7
8
9
10
11
# 1.0.8
dillionzhang | 2023.02.21 | 合并链接 (opens new window)
主要更新内容
1.修复同一个组件库内,不同组件不在同一任务队列发起请求时,后发起的组件取值为空,导致组件挂载失败的问题(此bug为小概率bug,只有在2个组件请求在极短时间内前后发起,而且先发起的请求还未响应时,才能复现)
2
3
# 1.0.7
dillionzhang | 2023.01.12 | 合并链接 (opens new window)
主要更新内容
1.修复当同一页面上不同组件内请求同一个组件库时,重复发起请求问题
2.修复当一个页面上不同组件内请求同一个组件库并且挂载同一组件时,重复挂载问题
3.优化开发环境 某些组件未在灰度,且未有稳定版本时,返回为空的异常抛错

此次更新针对之前已经接入的暂无影响,主要针对同一页面,在不同任务队列,重复发起同一组件库请求问题。切记如果业务工程再次接入新的微组件时,一定需要更新mimir
2
3
4
5
6
# 1.0.6
dillionzhang | 2022.12.08 | 合并链接 (opens new window)
主要更新内容
1.增加微组件嵌套场景
2.通过逐层从内向外挂载
2
3
# 1.0.5
zequanwu | 2022.11.28 | 合并链接 (opens new window)
主要更新内容
1.固定依赖版本
2.新增浏览器兼容,script跨域
2
3
# 1.0.4
dillionzhang | 2022.11.10 | 合并链接 (opens new window)
主要更新内容
1.修复组件初始不展示,在后续发起请求时,未清空上一次请求的section(白话版:组件第一次使用v-if=false等变量控制时,当变量变成true时,此时会触发组件请求,但还是携带了之前的组件库名)
2.修复组件初始不展示,在后续发起请求时,未挂载第二次请求的script
2
3
# 1.0.3
dillionzhang zequanwu | 2022.10.24 | 合并链接 (opens new window)
主要更新内容
1.在原营销微组件上兼容基础微组件
2.新增commonFetcher,适用于基础相关微组件的请求
3.使用时,新增一个project参数,用于工程灰度
4.支持多组件库同时请求
2
3
4
5